Documentation Index
Fetch the complete documentation index at: https://ketsol.mintlify.app/llms.txt
Use this file to discover all available pages before exploring further.
You are currently viewing documentation for version 1.0, which is no longer updated. Please refer to the latest version (2.1) for the most up-to-date information.
1. Introduction
This document serves as a comprehensive installation manual for the deployment of KMS . It encompasses both virtualized and physical installation strategies, with a focus on virtual machine deployment via Microsoft Hyper-V. Detailed attention is given to virtual hardware configuration, system initialization, Ubuntu operating system deployment, Docker environment setup, and network configuration.Pre-requisites -
- RAM (Memory) -Recommended: 32 GB RAM
- Minimum: 16 GB RAM (acceptable for limited use but not recommended for optimal performance).
- Storage - Type: SSD (Solid State Drive) – mandatory for faster performance.
- Minimum Capacity: 256 GB SSD (128 GB may work, but 256 GB or higher is strongly recommended).
- Processor (CPU) - Preferred: Intel Core i7
- Minimum: Intel Core i5 (only if i7 is not available).
- Operating System (OS) - Windows 11 Pro is required.
- Windows Home Edition is not supported – users must confirm the OS version.
1. Enable Hyper-V on Windows
- Open Start Menu, type Windo ws Features, and click Turn Windows features on or off.
- In the Windows Features dialog:
- Scroll to Hyper-V.
- Tick both:
- Click OK. and Restart your PC when prompted.

2. Verify Hyper-V Installation
- After restarting, open Control Panel ➔ Programs and Features ➔ Turn Windows features on or off ➔ confirm Hyper-V is checked.
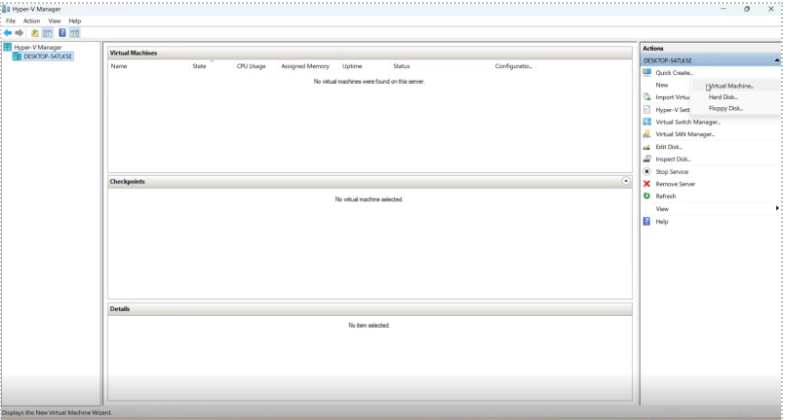
3. Create Virtual Machine in Hyper-V
- Open Hyper-V Manager.
- Click New ➔ Virtual Machine, follow the wizard:
- Assign a name.
- Specify memory (e.g., 8-16 GB).
- Configure network adapter ➔ attach to V Internet KMS virtual switch.
- Set virtual hard disk (VHD) size.
- Attach installation ISO if needed.
- Complete the wizard and finish VM creation.


4. Configure Hyper-V Networking
A. Configure Static IP for Virtual Switch_ _- Open Control Panel ➔ Network and Sharing Center ➔ Change adapter settings.
- Right-click vEthernet (V Internet KMS) ➔ Properties ➔ select Internet Protocol Version 4 (TCP/IPv4) ➔ Properties.
- Choose Use the following IP address, then set:
- IP address: 192.168.100.1
- Subnet mask: 255.255.255.0
- Leave Default gateway blank.
- Click OK, then Close.

- Open Control Panel ➔ Network and Sharing Center.
- Click Change adapter settings on the left sidebar.
- Right-click your active Internet connection (e.g., Wi-Fi or Ethernet) ➔ Properties ➔ Sharing tab.
- Enable, Allow other network users to connect through this computer’s Internet connection.
-
From the dropdown, select vEthernet (V Internet KMS) (your Hyper-V virtual switch).

5. Add Network Adapters
- In Hyper-V Manager, right-click your VM ➔ Settings.
- Under Hardware, add network adapters as needed:
- First adapter: V Internet KMS (for KMS or Internet access).
- Second/third adapters: for PLC or other networks.
- For each added adapter:
- Click Apply, then OK.


6. Start & Configure the VM
-
Start the VM from Hyper-V Manager.

- Login with default credentials:
- Username: root
- Password: Ketsol@1234%
- Run basic network configuration commands in VM terminal:
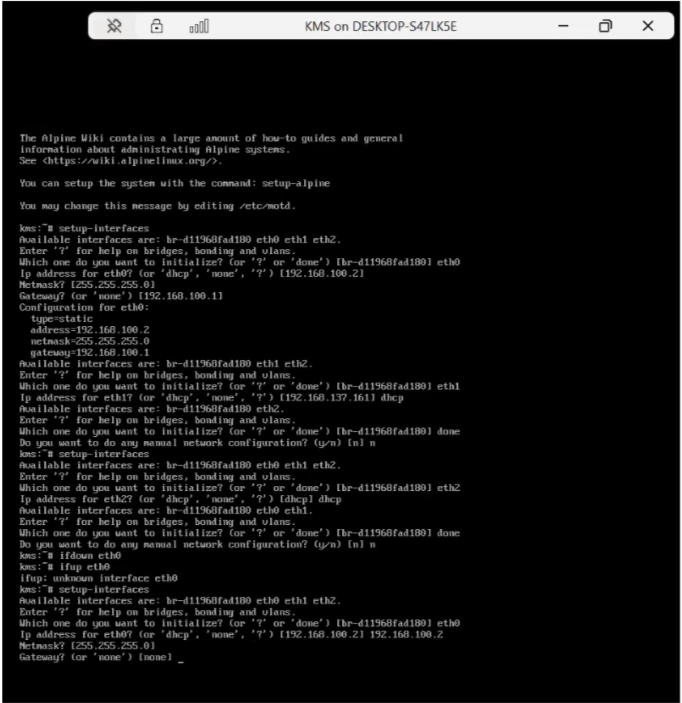
-
For eth0 (KMS network):
-
For eth1 (Internet/DHCP network):
- (Optional) For additional interfaces like PLC, assign static IPs (e.g., 192.168.2.10 for PLC device, 192.168.2.11 for your laptop).
7. Access KMS software
- Open the browser on your laptop.
- Navigate to http://192.168.100.2 (or the IP you set on eth0).
- Login with:
- Username: admin
- Password: admin
- Remember to check Remember Me before signing in.